
Are you struggling to get your vocals sitting where you want them to in your mix? Are they too low? Too loud? Both? I will, in this article show you some tricks that might help you get your vocals to where you want them to be.
A new year and new articles on the way. It’s been a while since my last article and there are several reasons for this. One is that I have been way to busy working in the studio and running a business. Sometimes I wish I actually had a crew to help me out.
On to the vocals
A while back I got approached by Novisione. A producer from the Netherlands currently studying in Sweden. He found me on Reddit after I answered someone’s question about going to audio college, something Novisione was considering to do. Despite me having studied at an audio college I actually advised Novisione to seek knowledge on the audio industry elsewhere. Said and done. Novisione asked me for help. I set up a Personal mixing lesson on his track ”Am I God” to help him get the tools he needed to get his vocals to where he imagined them to be.
Now you have a choice. You can either watch the video of this article or keep reading. If you decide to watch the video make sure you scroll down the page later to take part in a special deal I offer for a limited time.
Let’s get started
In Novisione’s track Am I God there are some minor issues, mix vise in the instruments as well as the actual vocal tracks. I will not go into detail on how to fix these or what issues there are. That is not the purpose of this article and video. The sole purpose of this video is to give you a tool to make your vocals sit right in the track and really sound professional.
There are several ways to go about this. One that I find works in almost every case is to use compression!
For educational purposes, I will use Steinberg Cubase Pro 10’s stock plug-ins. This way I think that non-Cubase users will find it a bit easier to translate the tricks into their DAW and VST plugins by choice.
I might also write that normally when I mix I use Slate Digital’s ”All-access pass” plugins. Mainly because they fit my workflow and style of mixing.
Let’s get compressing
The first thing you want to do is to get rid of frequencies that you don’t need or want in your mix. On vocals, you can usually use a high-pass filter to get rid of a lot of low-end. Bear in mind that there isn’t any exact spot for where to cut. Use your ears and stop when you get rid of what you want to leave out.
Another thing you can do if needed is to actually add some frequencies before you compress as well. For this particular track, I felt there needed to be some more ”Air” to the vocals so I added that. I also got rid of some annoying frequencies I didn’t want to enhance.
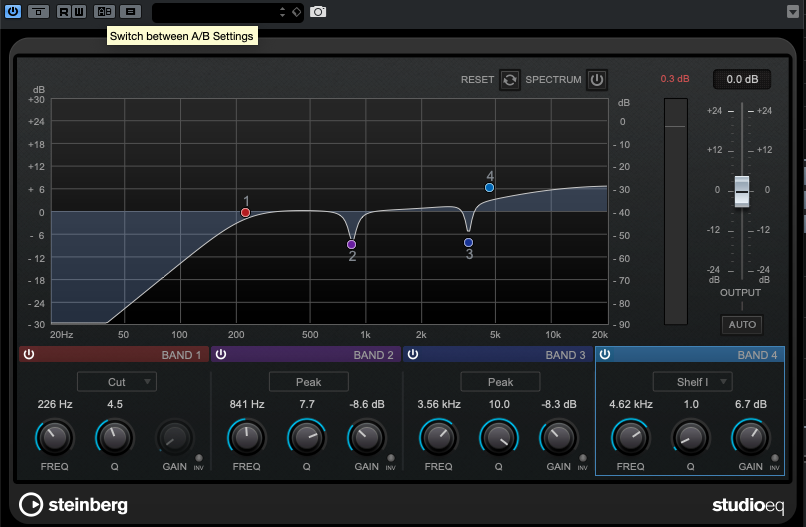
EQ into compression
On if the benefits and main reason for the action in the previous step are to get the compressor to work the way we intend. Low-end contains a lot of energy and will be the first the compressor starts to work on. This will result in something totally different than what we want.
I will not go into detail on how a compressor works in this article. I will, however, show you some techniques you can use to get better vocal mixes.
Fast attack, quick release
First off. Use a compressor with a fast attack and a quick release. This is done to get rid of the initial burst of power some vocalists use going into their verser, chorus or other parts. By using a fast attack and a quick release you bring these bursts down a bit and evens out the overall vocal performance. The timing is crucial so you don’t compress the longer notes with this compressor. Play around with your release times to find your sweet spot. The only way to do this is to use your ears. It might take some practice to get it right but when you find it you will now. Trust me.
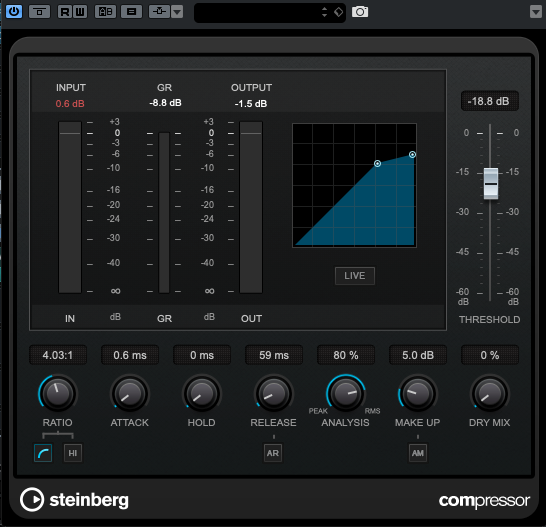
Next up is. You guessed it. Another compressor!
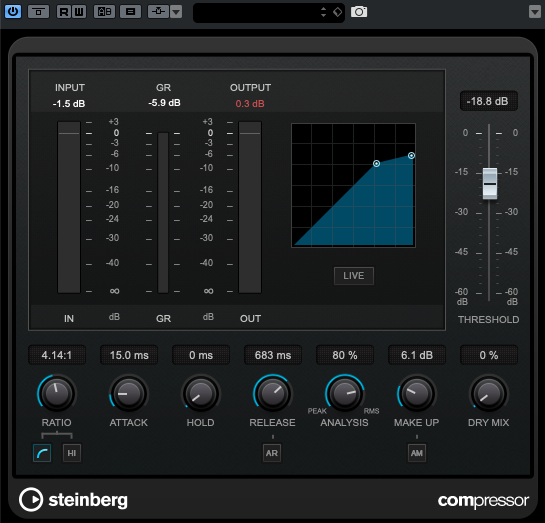
Slow attack, slow release
Most mixes you listen to on your favorite streaming service use more than one compressor on several of the tracks. Modern vocals are no exception to this.
In the previous step, we got rid of the initial bursts of power. In this step, our goal is to even out the vocal performance even more. To do this we use a second compressor set differently from the first one. The idea is to make this compressor start working right before the previous one stops.
Once again. This is an ear-thing. You need to listen to the vocals and decide where your release time should be. Set it to short and the vocalist will sound like they are out of breath. Set it to slow and it will start interfering with the short attack compressor. You get the idea. This is also a practice thing. Play around with the settings and find what works for your song. There isn’t a ”go-to” setting for this.
If you are having problems hearing what the compressor is doing, try to exaggerate the moves. Slam the threshold. Make the release really fast. Play around until you hear what it does. Then, dial it back. You don’t want to over-compress the vocals in your mix so be a little careful. If you can hear what the compressor is doing to prominent in your mix you might want to dial it back a little.
Obviously there is a lot more going on in the mix here. I won’t cover the EQ, De-Esser or effects processing going on in this article. I will get back to those topics in other articles.
A final quick tip
I will give you a quick tip on EQ before we part ways. Do not be afraid to do huge EQ moves!
Do you want more ”Air” in your vocals? Bring that high-end shelf way up if needed. The same goes for the ”body” of the vocals. If you don’t have enough. Boost until you do. An EQ is a tool to cut out what you don’t want and to bring in what you want, frequencies-wise. Use it accordingly. To quote one of my favorite mixing engineers.
Nobody’s going to die
Chris Lord-Alge
The offer
Like I promised at the beginning of this article. I have an offer.
For a limited time, you can get your own ”personal mixing trainer” for 50% off!
Fill out the form below, check the box stating that you want to join the newsletter and place your order before the end of February 2020 and I will give you the discount.
If you have a certain area in your mixing skills that you feel you need to improve. This is the time to do it! There is no better way of learning how to mix than to do it on your very own songs!
If your mixing skills don’t improve within 30 days from taking the class, I will give you your money back, or make sure that your mixing skills actually improve and get you to a new level.